Introduction
This is a good place to start reading if you have never scripted HFSS before. This will cover mostly how to script HFSS the normal way: by going through the user interface.
Scripting HFSS for Fun and Profit
When you find yourself repeating a task in HFSS (e.g. changing lots of variables based on the solution frequency), there is a good chance that you can save a lot of time by automating the process. Whenever you need to script something in HFSS, the easiest thing to do to figure out how to do it is to record it in HFSS, using the script recorder functionality.
Recording in HFSS
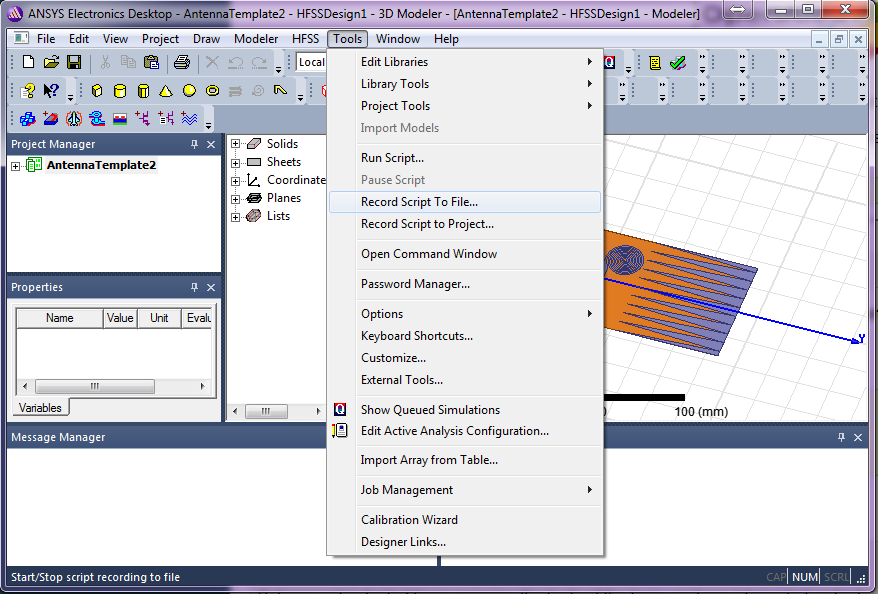
Almost anything you can do through the GUI in HFSS you can also do through a
script. The fastest way to find out how to do something in a script is to
record a script in the GUI and see what the script says. To record a script to
a file, click Tools → Record Script to File, as shown below. Select the
file name to save the script to. Then do whatever you want to record, e.g.,
change a setup’s solution frequency, or change some design variables.
When you are finished changing the things you want to change, click on
Tools → Stop Script Recording. If you changed Setup8’s solution frequency
to, say, 800 MHz, and changed a design variable N to, say, 7, you will get
a script similar to below.
# ----------------------------------------------
# Script Recorded by ANSYS Electronics Desktop Version 2015.0.0
# 10:04:03  May 13, 2015
# ----------------------------------------------
import ScriptEnv
ScriptEnv.Initialize("Ansoft.ElectronicsDesktop")
oDesktop.RestoreWindow()
oProject = oDesktop.SetActiveProject("AntennaTemplate2")
oDesign = oProject.SetActiveDesign("HFSSDesign1")
oDesign.ChangeProperty(
    [
        "NAME:AllTabs",
        [
            "NAME:HfssTab",
            [
                "NAME:PropServers",
                "AnalysisSetup:Setup8"
            ],
            [
                "NAME:ChangedProps",
                [
                    "NAME:Solution Freq",
                    "MustBeInt:="           , False,
                    "Value:="               , "800MHz"
                ]
            ]
        ]
    ])
oDesign.ChangeProperty(
    [
        "NAME:AllTabs",
        [
            "NAME:LocalVariableTab",
            [
                "NAME:PropServers",
                "LocalVariables"
            ],
            [
                "NAME:ChangedProps",
                [
                    "NAME:N",
                    "Value:="               , "7"
                ]
            ]
        ]
    ])
The great thing is that you don’t need to completely understand what’s going to
get stuff done with scripting. The first 4 lines are just comments, and do not
do anything at all. Lines 5-9 are just boilerplate: setting the active project
so we can actually make changes. Lines 46-64 are all for changing Setup8’s
solution frequency to 800 MHz, and lines 66-83 are for changing the design
variable N to 7.
You can use the GUI to record a script to do lots of different things, including
- Exporting a dxf file
- Changing a material
- Running an analysis
- Export a report
- Opening a project
- Creating a geometry
and more.
Completely Automating the Process (Command Line)
The goal of this project is to be able to script HFSS with as little
intervention as possible. For example, it would be really nice if we didn’t
have to manually open HFSS to run the script. Conveniently, it is possible to
avoid manually opening the GUI to run a script through the command line
interface. From the command line, you just have to type ansysedt
-RunScript my_script.py, or if you don’t want to keep HFSS open after the
script runs, type ansysedt -RunScriptAndExit my_script.py. You can have
Matlab call HFSS by using the system function, and call it like this:
system('"C:\Program Files\AnsysEM\AnsysEM16.0\Win64\ansysedt.exe" -RunScriptAndExit "my_script.py"')
Note
You probably need to type the whole path to the hfss executable, and not
just ansysedt as above; you can find the path by right-clicking on the
HFSS shortcut, clicking “Properties”, and copying the text in the box
labeled “Target.”
Note
Whenever you try to run a script from the command line, the script must be completely self-contained; meaning you cannot count on any project being opened already. You can make your script open a project, or create a new project, and this is the strategy that should be followed.